Using robots.txt to prevent staging sites from indexing

Long ago, I had the unfortunate experience of having a staging site rank alongside a production site in Google search rankings. There was a new feature to be added to the site so I had taken a copy of the live site and migrated to my staging site for testing.
The site was using WordPress so, naturally, when the live site was migrated it had overridden the robots.txt file that was in place on the staging site to prevent it from being indexed.
To help you avoid this issue, I’ll go over the basics of the robots.txt and the solution to prevent your staging site from being indexed, even after pulling a copy of the live site.
How does my site get indexed in the first place
For your site to appear in search results, it needs to be scanned (or “crawled”) by a bot.
That bot then tells your search engine provider “Hey! I found this site and here’s all the content. If someone searches for this kind of content, you should show them this site!”.
For example, Googlebot is a bot that will help get your site displayed in Google search results. There’s also Bingbot for Bing, DuckDuckBot for DuckDuckGo, you get the idea.
By default, these bots will scan all your pages and content to serve them up in search results.
This is all well and good on your production site which we want the world to see but becomes a problem when the bots try to crawl a staging site that is only meant for you and your client.
So we need a way to tell these bots not index our staging site, and we can do this using robots.txt.
Using robots.txt to stop the bots
Using robots.txt, we can communicate with the bots. There are lots of things we can tell the bots to do, and we can even specify which bots we issue the commands to, but in our case we want to tell all the bots to not index the entire site.
In our root folder of the site, you simply create a text file called robots.txt. In that file, we only require two short lines.
User-agent: *
Disallow: /
User-agent is just a fancy way of specifying the bot we want to communicate to. * is robot speak for “All”, so our User-agent line translates to “I want to communicate with all the bots!”.
If we only wanted to communicate with a specific bot, like Googlebot, we’d do this.
User-agent: GooglebotDisallow is where you tell the bot which page URLs it shouldn’t visit. / tells the bot not to visit any page on the site.
We can also create multiple Disallow rules if we only want to block bots from certain directories.
Disallow: /directory/subdirectory/Finally, we can also give multiple Disallow rules to multiple different bots! I haven’t found much use for this out in the wild but it’s handy to know it’s possible.
User-agent: GoogleBot
Disallow: /this-directory/
Disallow: /that-directory/

User-agent: DuckDuckBot
Disallow: *

User-agent: Bingbot
Disallow: /that-directory/Remember, we want to add robots.txt in the root folder of our website.
It’s also worth noting that although Disallow tells the bots which pages it shouldn’t visit, the bot doesn’t have to obey the order.
Most bots are polite and will obey the robots.txt file but more malicious bots may choose to ignore it and enter without knocking.
How to test if robots.txt is working
Great, we have our robots.txt file set up! Now how do we check it’s actually working? I typically use technicalseo.com which allows you to paste in the website URL you want to test and returns the robots.txt files content.
If the content displays our snippet then you successfully set up the robots.txt file!
If it didn’t return our snippet then there’s a number of possible causes:
- The firewall on your site is too strict and is blocking bots/readers from accessing your site.
- The CMS you’re using (or a plugin within it) is setting up its own robots.txt which is overriding your custom robots.txt file.
- Syntax error in your file.
Prevent your robots.txt from being overridden
Now for the juicy part! Our goal is to keep the robots.txt file in our staging environment intact even after we copy over the live environment.
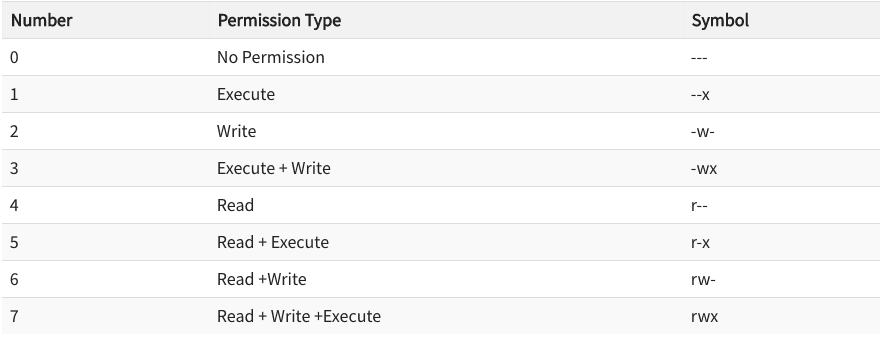
What we are going to do is change the file permission on our robots.txt file to 0444 or read-only. You’ll need cPanel or FTP access to do this.

What 0444 roughly translates to is that we don’t want the file to be executable or be overwritten, only allow the file to be readable. If you’re wondering what the numbers mean you can refer to the table below.
File permissions is a small topic on it’s own so if you’re interested in learning more check out this article.
Conclusion
By writing our robots.txt file to tell bots to not index our site and by setting the permissions on the file to be read only, we should have saved our site from being indexed!
There are other solutions that involve adding a login screen so the site can’t be viewed without the correct credentials but I found that can cause issues with deploying the code and database to different environments.
If you’re looking for more info on robots.txt I’d recommend having a look through https://www.robotstxt.org/faq.html
Continue Reading
-

Web Accessibility & Why its Crucial in 2021
Web accessibility is all about inclusivity. It’s the idea that everyone, regardless of limitations, should have the same opportunity to view content on the web like everyone else. These limitations include visual, auditory or physical disabilities. Making your website accessible will become ever more crucial in 2021.
-
JavaScript ES6: The Basics of Classes
In this article, you’ll see how messy and complex it is to set up prototypal inheritance in ES5 and how you can use JavaScript ES6 Classes to make understanding and implementing inheritance much easier!
-
CodePen Challenge: Card Text
In this week's CodePen challenge we get the opportunity to take a basic template of three content cards and breath a bit of life into them using our own custom CSS styles.
-
CodePen Challenge: Gangnam Style
For this week's challenge, we make the shift from MTV to YouTube with the first video to get 1 billion views: "Gangnam Style" by Psy. Love it or hate it, if you were online in 2012 you definitely saw it. And you can't deny it's got some great colors!